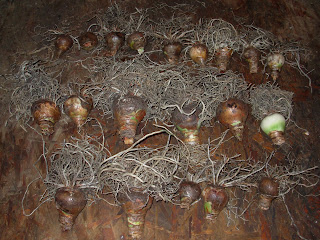
A snowy January day is perfect for repotting my amaryllis! The bulbs have been lying dormant since mid-October. I bring in the pots containing the plants as frost approaches and put them on the shelf in the garage. They remain there without water until time to reawaken for spring.
Here’s what an amaryllis looks like in bloom. My bulbs are either red, pink or red-striped.
I gather all the pots from the garage, a new bag of potting soil and get to work. I pick up the first, shake the bulb out of the pot and remove all the old soil, saving it for the compost.
Some of them have babies on the side. I snap them off and add them to the pile. The roots should stay on the bulb.
After I have done all of them, I inventory. I have 7 large (3-4 inches in diameter), 47 medium, (2-3 inches) and 15 small (about 1 inch). All of mine are offspring of bulbs I have purchased several years ago. If you take care of your amaryllis bulbs, they can bloom year after year.
I start repotting the bulbs in fresh soil-less mix. I add a few grains of slow-release fertilizer to help strengthen the bulb. Be sure to cover the fertilizer. The larger ones get their own pot, since they have the best chance of blooming. The smaller ones are grouped into a pot. They can grow in strength and perhaps bloom another year.
After all are potted, they get watered and go into the greenhouse to start putting out foliage and perhaps blooms. It’s a treasure hunt to check them each day for progress. The strap-like leaves appear from the center, and the bud stalks from the side. Usually, when an amaryllis blooms, I give it away. It’s a nice, cheery gift in the late winter gloom. When all danger of frost is gone, I take them out of the greenhouse and place them on an area of my driveway that gets morning sun and dappled afternoon shade. This location is easy to water. There they live happily until the fall and the cycle starts again.


No comments:
Post a Comment