Tuesday, January 25, 2011
Preparation for Spring
Friday, January 21, 2011
The Seeds Have Arrived
It continues to snow in East Tennessee, so the warmth of the greenhouse feels good! A few more cuttings have bloomed.
Lantana
Geranium

Pentas

The geranium is special. My late mother-in-law grew this. She had admired it at a local church, and asked for cuttings. I rooted them for her, and she grew them that summer. In the fall, I made cuttings to over-winter. After her death in 2003, I’ve kept it up.
Meanwhile, the seeds have arrived! I’ll wait until about 6-8 weeks before I plan to start them. The average last date of frost locally is April 2, so I usually start my planting early to mid-April. Thus, the seeds need to be started early to mid-February. I'll be working on that soon.
Friday, January 14, 2011
Starting Seeds
It continues to be snowy this week, and I am thinking about seed starting for spring planting. I have ordered my seeds from parkseed.com, although they haven’t arrived yet. I like to start unusual plants which can’t be easily found for sale locally in the spring. I have ordered a Magellan zinnia collection which consists of seven packages of 25 seeds apiece of various colors of dwarf zinnias. These plants grow to about a foot high. I like the dwarf better because you don’t have tall plants falling over during the summer. I also have ordered Crystal White Zinnia. Its 1-2 inch blooms looks like a daisy. This particular series of plants doesn’t need deadheading, which saves a lot of time. As a matter of fact, the National Garden Bureau has declared 2011 The Year of the Zinnia. Zinnias can take the heat and humidity of our summers. In general, the hybrid varieties available from seed retailers are mildew resistant.


The greenhouse is full of cuttings I made last fall. Here are a couple of bacopa that are in bloom. The cold, snowy days of January are good to spend in the greenhouse!
Friday, January 7, 2011
Repotting amaryllis bulbs
A snowy January day is perfect for repotting my amaryllis! The bulbs have been lying dormant since mid-October. I bring in the pots containing the plants as frost approaches and put them on the shelf in the garage. They remain there without water until time to reawaken for spring.
Here’s what an amaryllis looks like in bloom. My bulbs are either red, pink or red-striped.
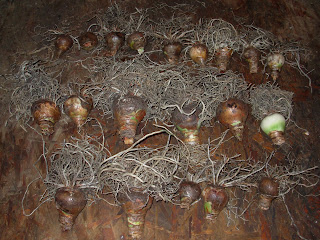
I gather all the pots from the garage, a new bag of potting soil and get to work. I pick up the first, shake the bulb out of the pot and remove all the old soil, saving it for the compost.
Some of them have babies on the side. I snap them off and add them to the pile. The roots should stay on the bulb.
After I have done all of them, I inventory. I have 7 large (3-4 inches in diameter), 47 medium, (2-3 inches) and 15 small (about 1 inch). All of mine are offspring of bulbs I have purchased several years ago. If you take care of your amaryllis bulbs, they can bloom year after year.
I start repotting the bulbs in fresh soil-less mix. I add a few grains of slow-release fertilizer to help strengthen the bulb. Be sure to cover the fertilizer. The larger ones get their own pot, since they have the best chance of blooming. The smaller ones are grouped into a pot. They can grow in strength and perhaps bloom another year.
After all are potted, they get watered and go into the greenhouse to start putting out foliage and perhaps blooms. It’s a treasure hunt to check them each day for progress. The strap-like leaves appear from the center, and the bud stalks from the side. Usually, when an amaryllis blooms, I give it away. It’s a nice, cheery gift in the late winter gloom. When all danger of frost is gone, I take them out of the greenhouse and place them on an area of my driveway that gets morning sun and dappled afternoon shade. This location is easy to water. There they live happily until the fall and the cycle starts again.
Subscribe to:
Comments (Atom)


